In this post I will describe more details about the dyebaths we made at the Inside-Outside Conference in Keene on October 21st. We ran four dyebaths with madder root, marigolds, weld, and orange cosmos. As usual when I am running or leading an event, I didn’t get any photos. Hopefully the notes provided here will be useful even if they are lacking in visual information.
First of all, the fiber we were dyeing was woolen yarn. We dyed four skeins, each of which was 4 oz. I had pre-mordanted the skeins many weeks earlier with aluminum sulfate at a rate of 2 Tbsp. per 8 oz. (2 skeins could fit in a pot). The skeins had dried in the meanwhile, and had been soaked in water on the day of the workshop to “wet them out”, i.e. make sure they were thoroughly wet before dyeing.
Each dyebath heated for about 45 minutes to an hour. While they were heating, we were inside and they were outside, so we did not monitor the temperature. We strained the baths one at a time over a fifteen minute period of time. The skeins only sat in the dye baths briefly at first, long enough for participants to see some color emerging on the skeins. Then I had to pack everything up and bring it home. I transported the wet skeins in tubs and the dyebaths in empty gallon jugs. Once I got everything home, I put the skeins back into the pots with the dyebaths to soak. The next day, I heated the skeins in the dyebaths for a full hour and let them soak overnight again before pulling them out to dry and eventually wash.
Madder–The day before the conference I weighed out 4 oz. of madder roots, put them to soak in a pot of water, added about a teaspoon of calcium carbonate and a Tablespoon of soda ash (which made the bath about pH 8), heated the pot to about 160 degrees, maintained the heat for an hour, and then let the whole thing cool overnight.
I’m not exactly sure where I picked up this term, but when I’m heating up plant material to make a bath I often refer to it as an “extraction”. So, this was the first extraction of the madder roots. I saved the strained liquid from that extraction, plus the original roots, and we made a second extraction from that same 4 oz. roots at the workshop. We added more water to the roots, plus calcium carbonate and soda ash to get a really high pH–it was like pH 10 or 11! I figured this wouldn’t hurt the roots. Plus we were pressed for time and getting more water to dilute the bath involved running up a flight of stairs and down a hallway to a bathroom with a shallow sink. So, pH 11 was good enough for the time being. We let that heat up on the low/simmer side of the hotplate for about 45 minutes.
When we came back outside to make the dyebaths, we strained out the roots and combined the high-pH extraction with my original extraction. The lower-pH bath was a much more orange color, whereas the high pH bath was much more of a cherry-red. We could see a difference in the color of the foam at the surface when we poured the two baths together. Together they made a sensible pH for wool. We lowered the first 4-oz. skein into the dyebath so that participants could see the color “strike”. That’s what it’s called when color first starts to attach to the fiber. It happens quickly with some dyes and more slowly with others.
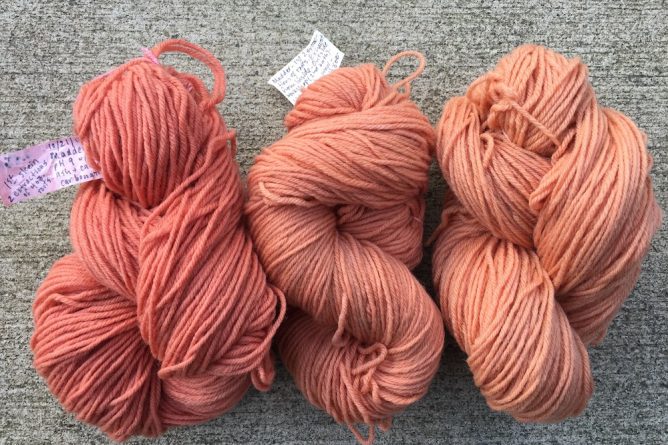
The next day, I re-heated the original skein in the original bath for an hour at 140 degrees or so, and let it sit overnight. Then I exhausted that bath with a second 4 oz. skein. After that, I extracted the same roots two more times with calcium carbonate and soda ash to keep the pH around pH 8-9. I combined the two extractions to make a third dyebath, and dyed a third woolen skein that had been premordanted with alum. The combined exhaust dyebath was also pH 9. The color was practically indistinguishable from the original exhaust skein. Here are the three skeins together once they were all rinsed and dried:
It is possible to obtain much richer shades of red with madder root by making a more concentrated dye bath, but then you are looking at days and days of exhausting the bath, resulting in a small amount of reddish yarn and lots and lots of pink yarn. I tried to go easy on myself this time.
Weld–This is another pH sensitive dye plant that makes a kind of blah greenish yellow at a neutral pH and eye-poppingly bright yellows at a higher pH. We used 4 oz. of dried plant material. In an ideal world this would have had time to heat, soak, then sit around a while and steep. As it was, the plant material heated up for 45 minutes to an hour, then we strained it right away to make the dyebath. We added soda ash and calcium carbonate to get a bath of pH 8, and after all was said and done I got a nice yellow. I did not exhaust that bath.
Orange Cosmos–This is also a pH sensitive dye, which becomes more red in color at a higher pH. However, we didn’t bother to modify the pH in this workshop. We used 4 oz. of frozen flowers. Like the others, this dyebath heated up for 45 minutes to an hour before straining. The next day when I was dyeing the skein at a more leisurely ace, I left the pH alone. I didn’t even check it, so I can’t tell you what it was. The color was a pleasing tangerine, but not dark enough to bother exhausting.
Marigolds–We used 4 oz. of dried flowers to make the dyebath with no pH modification. The resulting color after heating for a full hour on Sunday was a sort of mustardy yellow or yellow-orange.
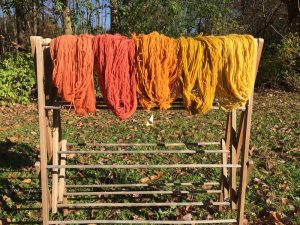
Together they make a nice range of colors. Here are all the skeins again (this is the same photos as my earlier post), minus the third madder exhaust:
From left to right: madder exhaust, first madder bath, orange cosmos, marigold, weld. I decided to use the same ratio of plant material to fiber for every dyebath, namely a one-to-one ratio. This was primarily to keep things simple for all of us. We could have made a more concentrated bath of weld, but 4 oz. of plant material filled up the pot, so that was really our limiting factor. A higher ratio of plant material would make for a stronger dyebath.
I hope some of these educators got inspired to dye with their students (or at home just for fun)!


