
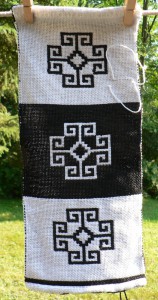
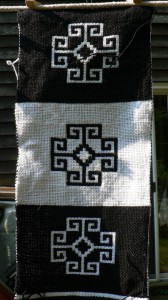
Doubleweave pick-up is a way to weave a reversible pattern by manually picking up the threads from the bottom layer and bringing them to the top. In those same areas, the threads from the top layer show up on the bottom. Before I go any further, here are the two sides of my sample so you can picture the end result as I describe the process.
In the previous post you saw the warp with alternating white and black threads. I threaded one black, one white, in a straight draw (shafts one, two, three, and four in that order). Even though my loom can do multiple tie-up (more than one harness can be attached to a treadle), we did a direct tie-up for this project. I have a rising-shaft loom, so when I step on a treadle, all the threads attached to it go up, and all the other threads stay down. My pattern is a motif called “kaikalak,” which I found in Tribal and Village Rugs by Peter F. Stone. I drew my pattern on graph paper, and checked off the squares for each row as I wove them. It takes four weft picks to equal one row or square of the pattern going vertically (two on each layer), and two warp ends to equal a square going horizontally.
Here’s what you do. First, you need some tools. The long pick-up stick (beautifully crafted by master weaver and woodworker Lynn Fate) is for picking up the ends you want for the pattern. The shorter, light colored stick I used for clearing the shed, that is, making sure that all the threads that are supposed to be down are actually down.

This is a two-shuttle technique, one color weft for the top layer and one for the bottom. You want to keep the edges joined together, so you pass the weft threads around one another so they “lock” at the selvedges.

Above is a shot of the two layers when they are separated. White is on top, for the first section of my sample, which means white is the background color and black is the design or pattern color. Mid-way through I switched it so that black was on top. In the photo below you can see the bottom layer of cloth.

To weave plain weave with a single layer of cloth, you make half of the threads go up and half stay down. This division of half-up and half-down creates a gap between two sets of threads. The gap is called the shed. You pass your shuttle with the weft thread through the shed, beat it into place, and then change to the alternate shed. On the next row, the other half of the threads go up.
In doubleweave, you need a plain weave shed for each layer of cloth. You weave half of the top layer, half of the bottom layer, the other half of the top layer, then the other half of the bottom layer. Luckily this is all controlled with treadles. Below you can see the plain weave shed in the white layer of the cloth, with the white weft thread passing through it.

So far so good. We can weave two different colored layers of cloth. But how do you get the pattern? First, step on the treadles that lift up the bottom layer (in my case, black), and pick up the warp threads, called ends, that you want for that row of your pattern. You actually have to pick up two threads for each single square on the graph paper, but even numbers are easy to deal with. You can see the picked-up pairs laying across the stick in the picture below (black in this case).

Then you lower the rest of the bottom layer, keeping up the picked-up threads with the pick-up stick. Push the pick-up stick toward the reed. Next, raise half of the top layer in order to weave the background. At this point you need to “clear the shed.” I couldn’t get a good photo of this step. I used the shorter pick-up stick to nudge down any ends that had gotten stuck to the top layer.

Then pass the shuttle through with the background weft. In this case I’m weaving the white background.

Then you beat that pick (the weft thread) down into place. Cool optical illusion of the warp through the reed in this photo.
After this you have to pick up the warp ends that make the background. So, you step on the treadles that lift the background color (white in this case), and pick up all the warp ends except the ones that made the black part of the pattern on the previous row. It is easier to see this than to write it. You skip the white threads that are immediately adjacent to the black threads you picked up in the previous row. To keep track of where I was, I marked the center of the reed with a colored thread so I could count. Nonetheless, I still made some mistakes.
Then you push all the picked-up white ends towards the reed, lower the rest of the white ends, raise half of the ends for the black layer (which is the background on the back of the cloth), clear the shed, and pass the black weft through. Then you beat.
To weave the other half of the top and bottom layers, you repeat the entire sequence above, but use the alternate tabby shed when you pass the weft through for each layer.
All of that is one square on the graph paper. Check it off, and move on. Yes, this is a slow process. But as Barbara put it, it is sort of like eating popcorn. Well, I’ll just weave one more row. OK, I’ll just weave another row. Three hours later, your neck is stiff.
Hopefully this gives you the gist of the process. Here are a couple images of the pattern forming. Again you can see what I thought of as the zooming warp ends beaming down into the emerging cloth, teleport-like. I also thought of it as the ghost of the pattern in the warp ends, or the contrails left behind when the little spaceship passed by.

