A Tale of Lichen and Weird Winter Weather (Parts One, Two and Three)

This is a long story. I will tell it in parts.

Part One: The Snow Storm

At the end of October, 2011, we had a big snowstorm. The snow was wet and heavy, and snapped and broke tons of trees and branches. There were sad broken trees all over the place, and it took a very long time for all the wood to get cut and stacked or moved away. In the woods, depending on how much people-traffic there is, a lot of trees and branches are resting where they fell to this day. And many of these trees and branches were, and are, covered in lichens. It was an unusually early storm with an unusually destructive impact–the first installment of the weird winter, weather-wise.

Part Two: Karen Diadick Casselman

Around this same time, I was planning a series of cellulose dye projects. One of the dyestuffs I wanted to use was an umbilicate lichen fermentation vat that had been sitting in the closet for an indeterminate length of time. Well, it was determinate. Since July 2006. I know, ridiculous. I blame my Master Weaver certificate. After so long, I figured it was time for a refresher on lichen dyeing, so I re-read Karen Diadick Casselman’s Lichen Dyes.

It is an inspiring book on several levels. I especially appreciate her guidelines on the ethics of gathering and using lichens, and her promotion of “salvage botany.” After rereading her book, I was embarrassed to realize how far I had fallen short of the Code of Ethics she outlines, and was motivated to try harder. She suggests learning to identify five species of lichen, including the Latin names, before you collect or use any. I haven’t done this.  I’m lucky to own an incredible resource, Lichens of North America by Brodo, Sharnoff and Sharnoff (a score at Raven Used Books in Northampton many years ago), so I don’t really have an excuse. Among her other recommendations, which I do follow:

“Focus your attention only on found (unattached) lichens.”

“Use for dyeing only those lichens that are conspicuously abundant.”

“Avoid using lichens to make unexceptional dye colors (e.g., beige).”

I take to heart, in particular, this admonition and astonishing, awe-inspiring fact:

“Learn to appreciate that large umbilicate lichens may be hundreds of years old. Respect these organisms as you would any other botanical specimen of mature years.”

Part Three: A Little Personal Lichen Back-story

My first lichen experiments were in 2004. I used two different types that had fallen from the trees onto a lawn on Cape Cod. With the boiling water method and no mordant on wool (Finn), one type produced a warm creamy yellow, and the other golden brown. I never did positively identify them. The one which made yellow was possibly some type of Usnea (my best guess was Usnea strigosa), the other possibly a Flavoparmelia (F. caperata?) or Rimelia (R. reticulata?).

Here are the same samples on two different color backgrounds. The sample in the center was first dyed in the yellow bath, then the golden brown one:


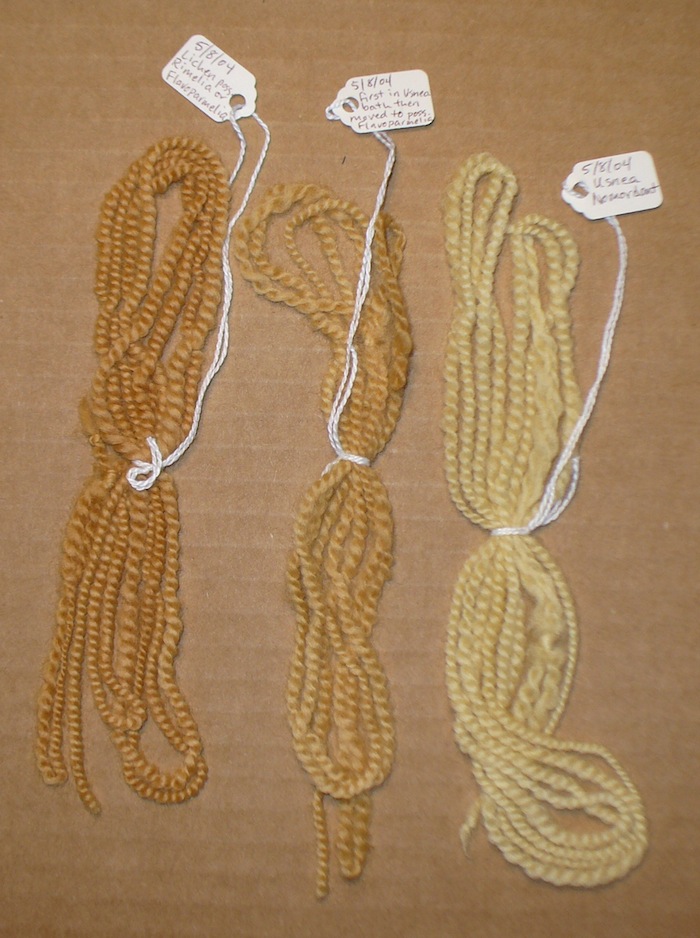
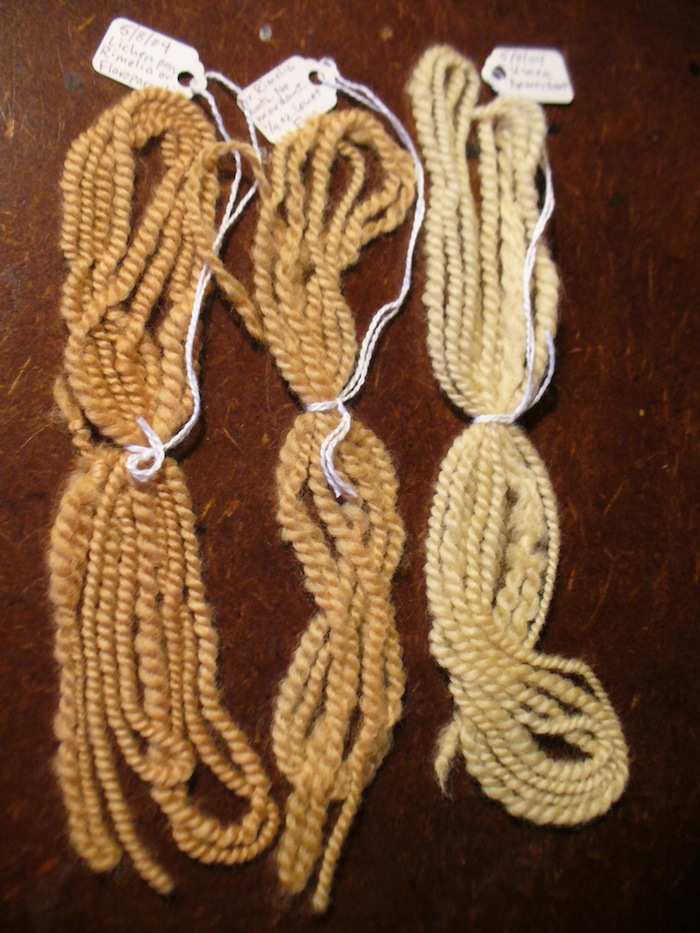
Both lichens yielded colors that were much better than beige, but I felt like I could get these colors in other ways, so I didn’t try them again.

Some lichens make amazing colors in the magenta, red, and pink range, with an ammonia fermentation vat. It is very hard to get these colors with natural dyes, unless you use cochineal. Cochineal is not local to New England. Plus, it’s pregnant female bugs and that just makes me feel bad. So, using these special lichens seems worthwhile to me.

These awesome lichens are called umbilicates. An umbilicate lichen attaches to its substrate (what it grows on) by an umbilicus, which is like a little foot or holdfast, or an umbilical cord. I’m sorry to say that I am still not positive if I have been using Umbilicaria americana or U. mammulata, or perhaps both (apparently they often grow together).

These umbilicates are not too hard to find, if you do a lot of hiking around in the woods. They grow on steep rock faces, and where they are happy you can sometimes find tons covering the whole surface. It’s a simultaneously earthly and alien sight.

Here are some happy lichens growing on a small south-facing cliff yesterday (February 6th, 2011):

umbilicate lichen on rock

umbilicate lichen on cliff
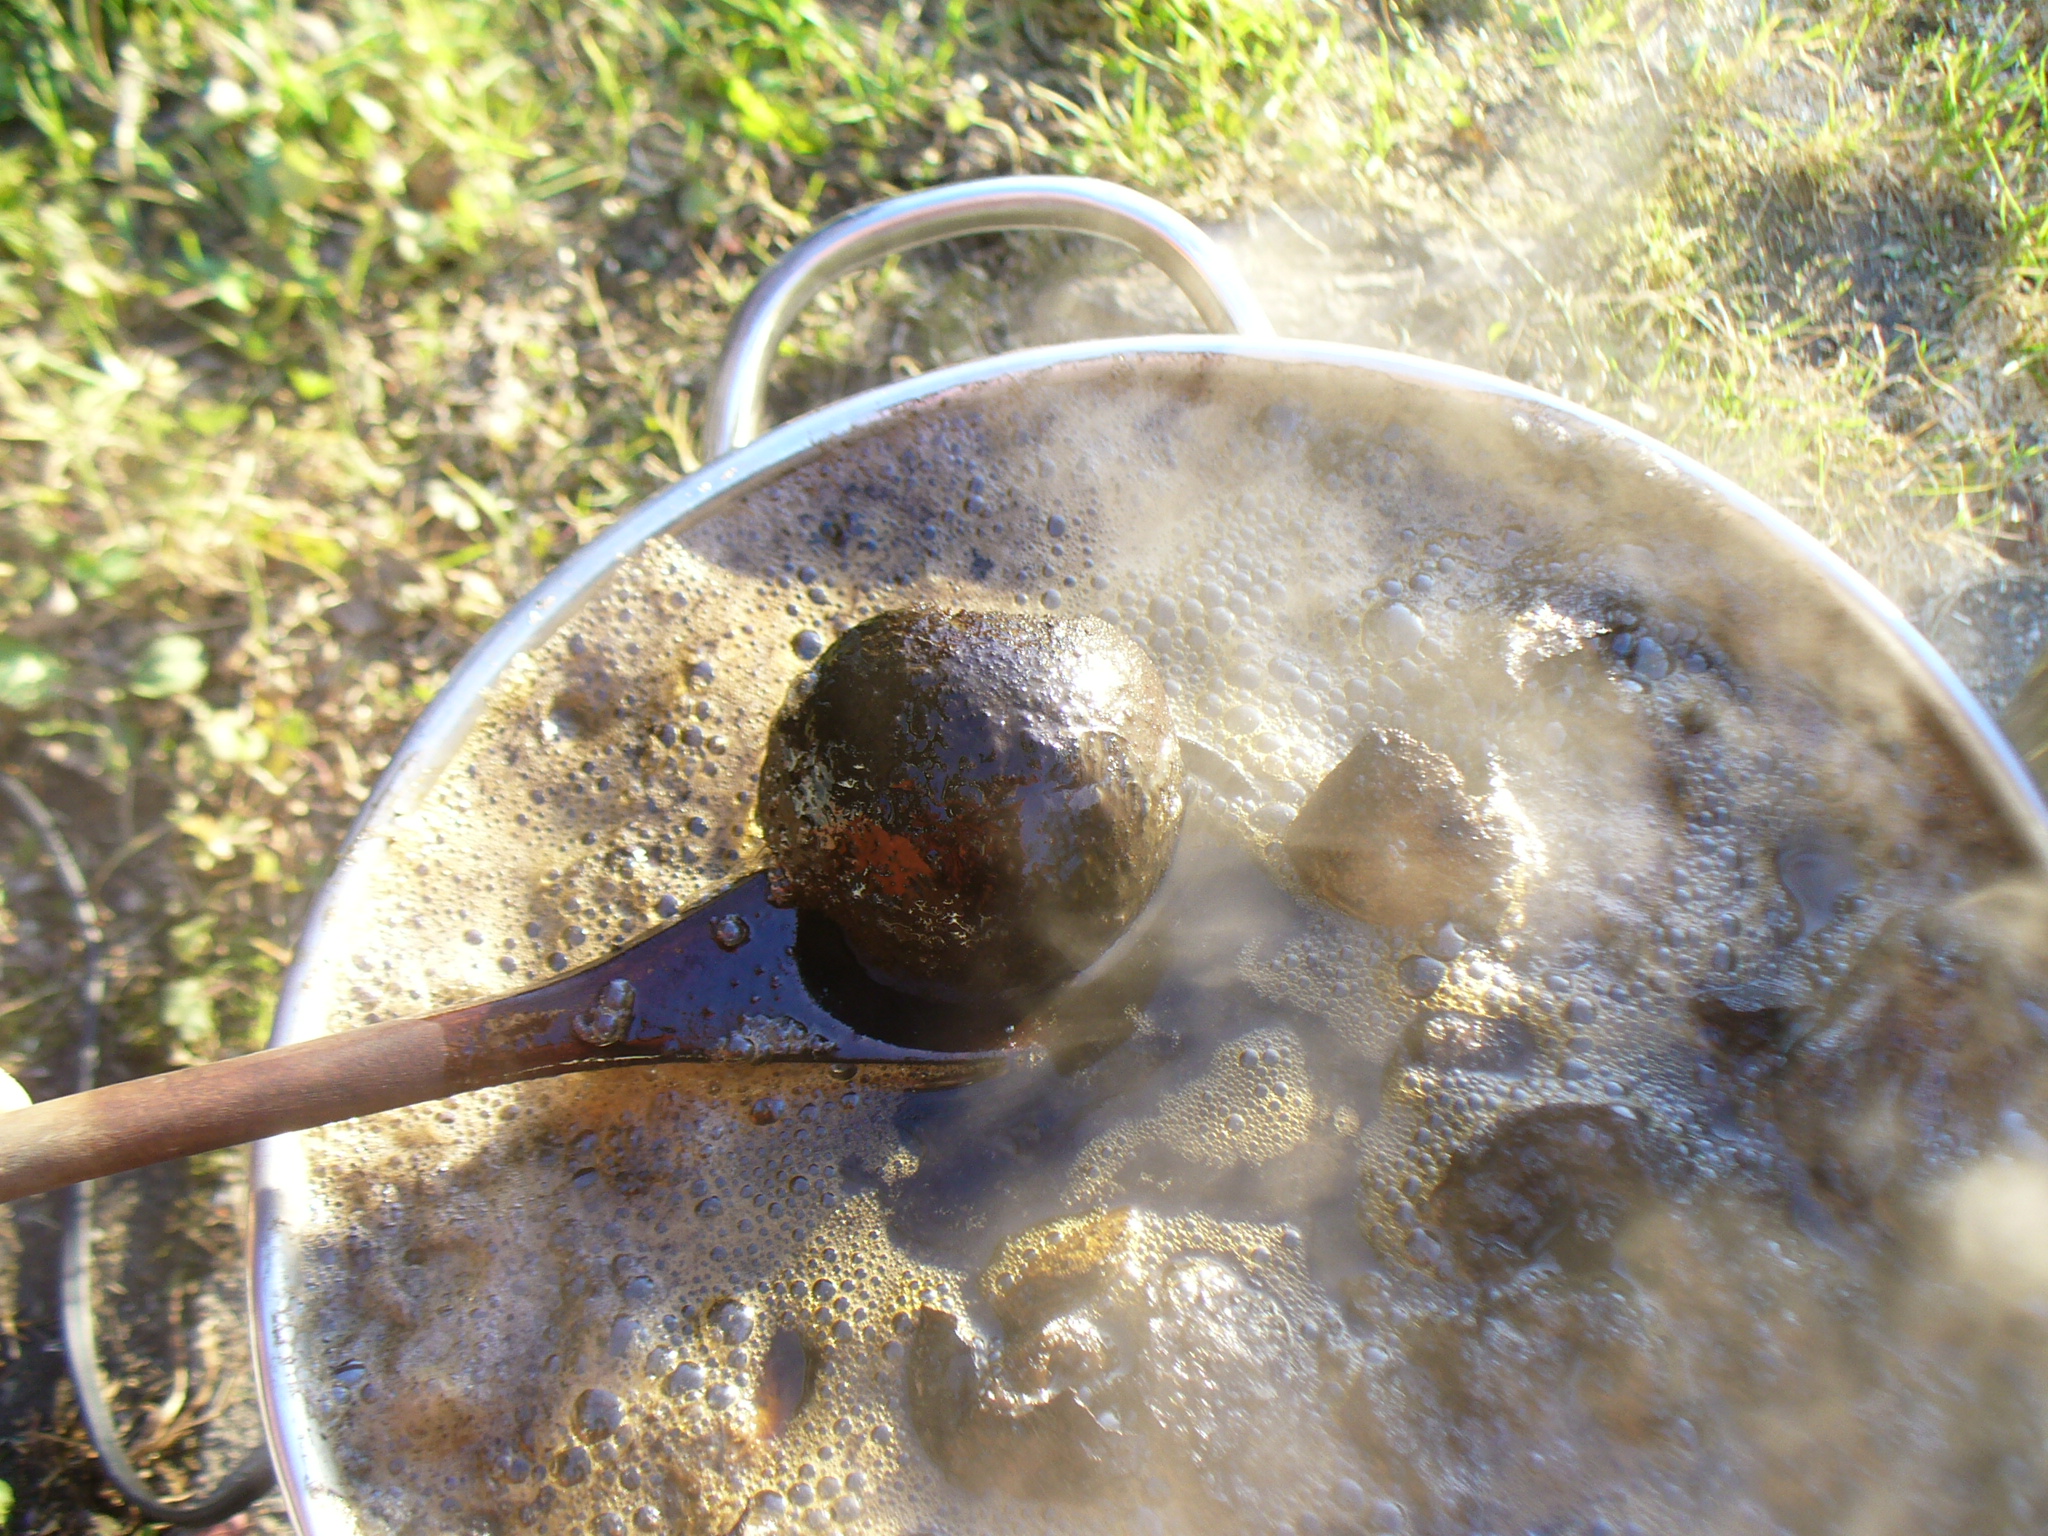
If you tear around the edge and leave the umbilicus attached, the lichen can keep growing. 12/17/2023 Editor’s note: Yikes! My deepest apologies for ever doing this! Don’t do this! Edge-pieces will fall on the ground all by themselves, and you can pick up the fallen pieces if you look around the base of the rocks.) My practice had been to gather infrequently and sparingly from several different spots. This was how I gathered the jar-full that had been sitting in the closet in an ammonia solution fermenting for oh so long. I have used them a few times very successfully on wool.

Here are the samples of my umbilicate dyebaths on wool, using the ammonia fermentation method that Casselman outlines in her book.

umbilicate lichen pale pink on wool


umbilicate lichen pinks on wool

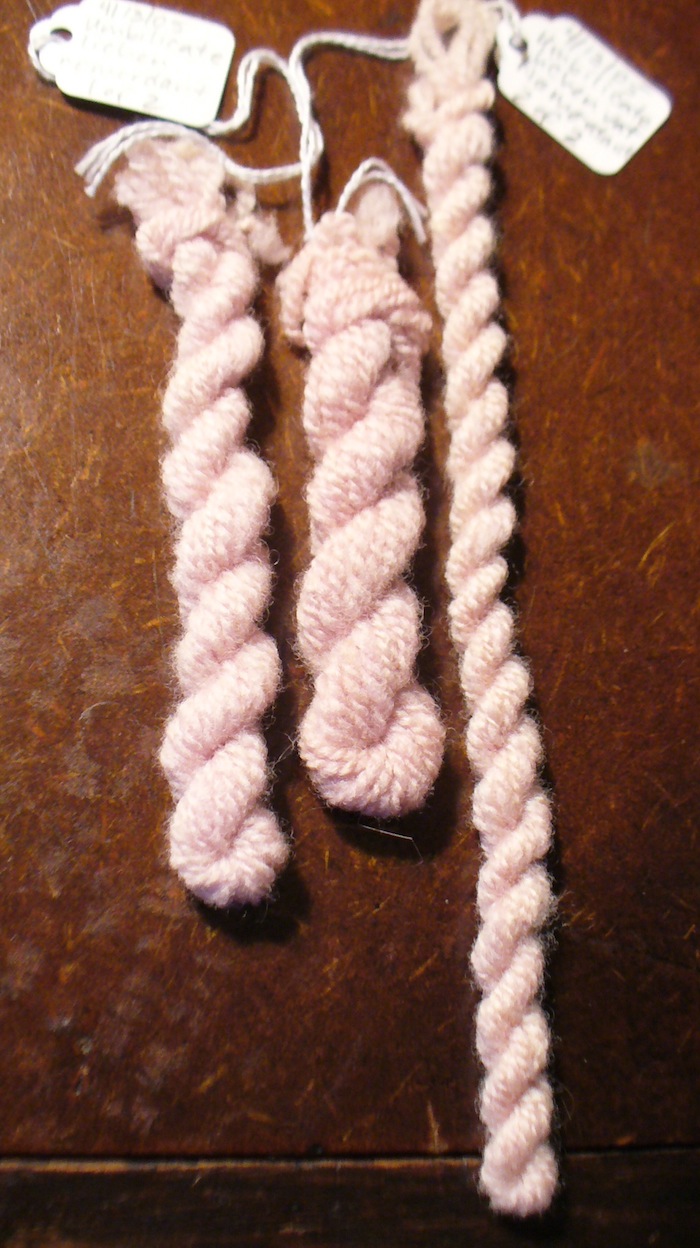
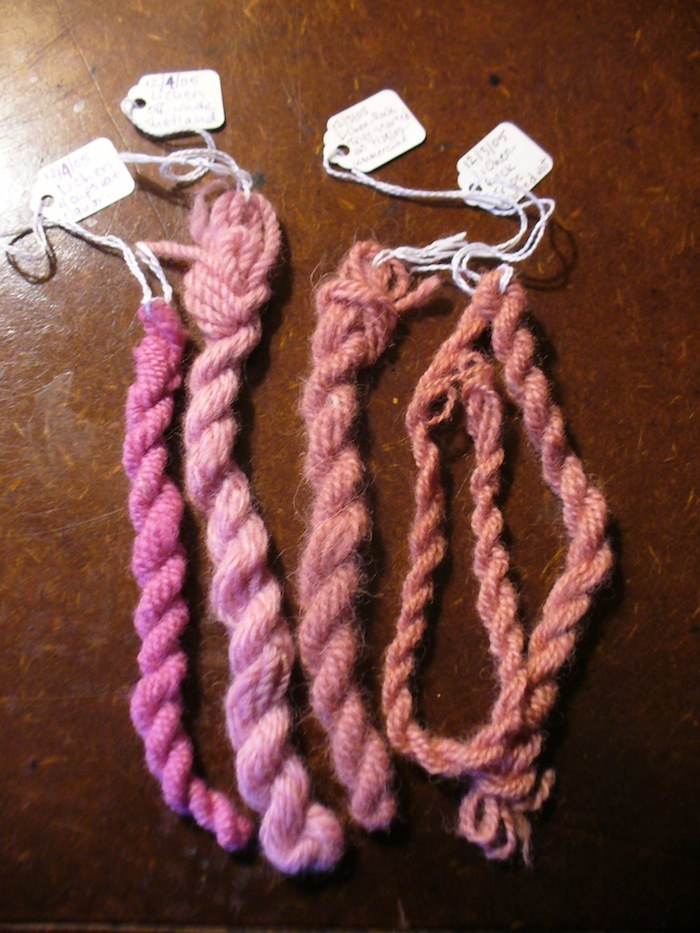
The top picture demonstrates that too much fiber will give pale colors, so don’t be greedy with umbilicate vats. This process requires a bit of discipline and restraint.  In the bottom picture, the difference in color between the samples on the right and the ones on the left is due to pH. The ones of the left were immersed in a high pH bath (not as high as the vat itself, but still very alkaline). For the ones on the right, I added vinegar as well as water to the vat solution, and got the pH down to 7. In general, higher pH (alkaline) will give more blue colors, and lower pH (acidic) will give more reds.

There’s more to come in the lichen saga, so stay tuned.


Black Walnut Dye Project

OK, I haven’t sewn a new book in a couple weeks because I have been taking advantage of the extended fall weather and have been dyeing (outdoors) with some particularly stinky and stainy dyes: weld, black walnut, and an ancient umbilicate lichen vat from 2006. Each one deserves a post of its own, so I’ll start with the black walnut.

The black walnut has been an unintended exhausting marathon. That’s a pun. “Exhausting” is what you call it when you re-use the same dyebath (or dye liquor, or ooze, depending who’s talking about it) multiple times until there is no color left. One of my on-going projects is to weave a series of rya rugs using a limited palette of yarns that I have dyed with a given quantity of plant material.

To dye the yarn for the first rug, earlier this summer I dug 5.5 lbs. of Lady’s Bedstraw roots. This quantity ended up dyeing 2lbs. 12 oz. of wool in various shades of pink, peach, apricot, salmon, and, yes, warm beige. Beige in any of its various shades is not my (or, I think, any dyer’s) favorite color. Certainly it comes in handy when you need some neutral to balance out a design. But considering all the work involved in dyeing with plants, especially when you start with the raw materials themselves, it’s not really worth it just to make beige, even warm beige. There are plenty of beige sheep. Creating beige does not inspire awe, or joy, in the dyer. It also does not impress non-dyers with the power and magic of natural dyes. Since part of my concept with this project is to demonstrate the incredible range of color that a single plant–even a single dyebath–can generate, too much beige defeats the purpose.

This year, as you may recall, was a bumper year for black walnuts around here.  I decided to commemorate the bumper black walnut year with a rya rug, even though I often joke that dyeing white wool brown is a questionable pursuit (there is probably a fairytale about the foolish girl who spent her time and energy on this…). There are plenty of brown sheep. Nevertheless, I really love noticing and celebrating the natural world around me, whether events are daily and mundane or unusual and remarkable. Being aware of and participating in the cycles of plants, especially, is one of my great joys in life, and one of the reasons I am passionate about natural dyeing. Plus, you can get an incredible range of colors from black walnut. Thus began the mega-black walnut project.

After the bedstraw experience, I decided I didn’t want as many beige skeins relative to the total quantity of yarn. So, I started with an admittedly huge amount of walnut hulls hoping for a lot of nice dark browns and not so many beiges.  OK, you can already tell at this point in the story that I was dreaming, but my vision was blocking my vision, so to speak, and I can only see that in hindsight. I started with nine and a half pounds of walnut hulls that had been soaking in buckets outside for several weeks. I usually think that boiling walnut hulls smell delicious, but these had an unpleasant “swamp” smell due to the fact that they had been decomposing in the relatively warm weather. So, this had to be an outdoors project, using the portable electric burner.

I don’t have large pots, so this whole operation is being run with small pots and small quantities. In fact, I’m thinking “Small Potatoes” may become the name of the series (assuming I ever actually weave these things). I divided the hulls between two pots and extracted the same hulls twice, creating 4 different dyebaths.

black walnut hulls and second dyebath

black walnut hulls and first dye bath

extracting black walnut

walnut hull in dyepot

When extracting the hulls you can let them boil and it won’t hurt the color, but it will make a huge mess if it boils over, so I kept a close watch. Above see the transition from, “a watched pot never boils,” to “boiling!” On the spoon is a portion of a hull in the dyepot.

Below on the left you can see the white skins being mordanted with aluminum sulfate, and on the right, the rich color of the dye bath once the hulls were strained out.

black walnut dyebathmordanting yarn


Ah, turning white wool brown!

Those four original dyebaths have thus far dyed 4 pounds of wool, in successive batches of 4 ounces each, and I have yet to reach beige (I’ve gotten to tan). I have been mulling for many days now whether or not to continue. I already have plenty of wool for a rug, at least a rug of the size I initially envisioned. But I have not truly exhausted the baths. I think I could dye another pound of wool before I actually exhaust the color.

I took a hiatus from the walnut project when we had a cold snap, and my pots and buckets froze (too stinky to keep indoors). Here are hulls with frost on them (which I could even extract again, if I was crazy) and a frozen dyebath:

black walnut hulls with frost

frozen black walnut dyebath


But I think I have to continue to the point of true exhaustion. A bumper walnut year calls for an epic quantity of brown yarn, and perhaps an astonishingly big rug.

Small Ones Farm

Many thanks to Sally and Bob Fitz of Small Ones Farm for inviting me to table at their fruit CSA pick up days on Saturday October 1st and Wednesday October 19th. It was very inspiring to meet their members, and I had many stimulating conversations about CSAs, locally sourced materials, natural dyes, local wool, flax, and vegan cloth.

At my table I displayed a basket of naturally dyed wool yarns that were mostly handspun by me, over the years, using natural dyes. For the madder, I displayed the results of a dye bath using roots from Earth Guild. (I have also bought madder root from Tierra Wools and Aurora Silk.) For all the rest, I used plants I gathered or grew myself in Amherst or the surrounding area. When I first began spinning, the most economical way to acquire a lot of wool was to buy raw fleeces. I bought and have enjoyed working with Corriedale from the former Mad Women’s Farm in Amherst, Dorset/Border Leicester cross from Natural Roots in Conway, Coopworth from Shirkshire Farm in Conway, the mixed breed flock at Hampshire College, and Romney and mohair from a few farmers I met at the Webs fleece markets. After I got tired of washing and carding my own wool, I’ve enjoyed roving from Balkey farm in Northfield and others. I also had a smaller basket of naturally dyed linen (commercial 40/2 from Webs). The yarns (and my bundle of home grown flax) were for show and tell.

And for sale, I had handbound books with handwoven cloth covers.

hand bound books with hand woven covers
Some of my hand bound books with handwoven covers.